|
Witchaven II Level Editor Expanded
Manual v9-17-2015 Release 78
© RTCM Richard Henning,
ETTiNGRiNDER, Corvin
Introduction
Files Needed |
Tools Download |
EGwhaven |
Group Files |
Game Switch
Overview
Modes |
Saving Maps |
Playing Maps |
Screen Shot |
Info on Current Sector
| Info on Current Wall or
Sprite
2D Edit
Movement
Mouse |
Arrow Keys |
Zoom |
Grid Resolution |
Grid Locking |
Blinking Line
2D Building / Creating Walls and Sectors
White Sectors |
White to Red Sector |
Delete White Sector |
Red Sectors |
Red to
White Sector | Blocking Red |
Delete Red Sector
Joining |
Create Point on Line |
Delete Point |
Group Cut and Move |
Group Drag |
Group Drag By Points
|
Splitting Sectors |
Circles
Sprites
Placing a Sprite |
Deleting Sprites |
Rotating Sprite |
Blocking Sprite |
Hitscan Sprite |
Tag a Sprite |
Copy a Sprite
Tags
Tag a Wall |
Low Tags |
Moving Red
Sector | Complex Doors and Tags |
Trap Low Tags |
Activating Sectors |
Activating Sprites
High Tags |
Warp Sectors |
Sector To Sector Warp
|
One Way Sector To Sector
Warp |
Level To Level Warp
Starting Point |
Playing
New Levels
3D Edit
Movement
Arrow Keys |
Vertical Control Mode
| Vertical Movement |
Vertical Viewing |
Locking Sectors |
Raising or Lowering
Sectors
Group Sector Move Up /
Down |
Dimensions
|
Switching 2D / 3D Mode
3D Building
Tile
Artwork | Get Tile Quickly |
Sliding Artwork |
Shrink / Stretch
| Auto Aligning Tiles |
Reset Tile Artwork |
Flip Artwork
Artwork Orientation |
Enlarge Tile |
Artwork Relative Alignment
Shading Tiles |
Auto Shading |
Group Sector Shading |
Visibility of Sector |
Visibility of Engine
Copy Attributes |
Paste Attributes |
Mass Paste |
Shade Paste |
Mass Replace
Parallaxing Sky |
Masked Walls |
Hitscan Wall |
One Sided Walls |
Two Split Wall Tiles |
Angles
/ Slopes
Sprites
Placing a Sprite |
Raise or Lower a
Sprite |
Sprite Artwork |
Sprite Relative Alignment |
Rotating Sprites |
Flat Sprite |
Floor Sprite
One Sided Sprite |
Flip Sprite | Transparent
| Shading Sprites |
Hitscan Sprite |
Clipping Fatness |
Copy a Sprite
Palette List
Sprite and
Tile Numbers
Spell |
Creature |
Weapons |
Magical
Items | Various Items & Tiles
| Skys |
Sprite Doors |
Activated Sprites
Sound List
Creating Specifics
Rising Room Door | Basic Door (Dropping or
Raising) | Horizontal Split Door
| Swinging Doors |
Pocket Doors
Water Flow |
Water Fall |
Bobbing Platform
Room with Trap |
Room Crush Traps |
Crush Trap (Pull Chain) |
Crush Trap (Floor Pad)
Proper Long Bow |
Statue |
Bat Cave |
Sprite Lift |
Sprite Door |
Fireball Trap |
Sprite Bridge
Revolving Sector |
Enchanted Well |
X Panning Wall |
Elevators |
Vertical Split Door |
Overlapping Sectors
Effects Found
WH2 |
WH1
| WH1Demo
Labyrinth Creator/Editor Expanded Manual
[BUILD Editor Text from WH2 README.TXT 3/22/96 Richard Henning /
Capstone]
[Hard Copy of the WH2 Manual was referenced]
[BUILD.TXT and BUILD2.TXT by Ken Silverman referenced]
[BUILDHLP.TXT by Allen H Blum III & Richard "Levelord" Gray referenced]
[DNEFAQ15.TXT by Klaus Breuer referenced]
["Learning The BUILD Editor" by Steffen Itterheim referenced]
[WH1 & WH2 src referenced]
"Never before has evil come so close. . . . "
:Sir Steve Newton , 28 February 1996
The following pages will instruct you on how to edit and create your
own vile and menacing levels of evil. Be warned, learning to create
such hideous labyrinths' takes time, but much can stem from a level
oozing with the glory of malevolence. Feel free to share your levels
with other Witchaven2 owners, as you become a master dungeon
creator.
Things that are needed to edit or create a new
map:
Witchaven II is based on version 7 of the BUILD Map format.
- The BUILD Editor, from Witchaven II.
- You need the TABLES.DAT that goes with it as well.
- PALETTE.DAT and LOOKUP.DAT of Witchaven II's palette in BUILD
version 7 format.
- All the Witchaven II .ART files.
- The Witchaven II NAMES.H which will let BUILD display
special names for those tiles that have them (usually sprites which have
special functions when placed.)
Once the above items have been gathered in a folder (Preferable \BUILDEDT
and NOT your main Witchaven II folder, as this may impair running the game),
editing may proceed according to the usual usage of BUILD. To edit a
map, it must be in version 7 format. Note: WH1 maps convert from map format
v6 to v7 very well for
the most part, however some textures where moved, added or removed in WH2.
The Updated WH2 Tool:
Can be found in
the download section:
witchaven-tools
There you'll find all tools available to edit WH2
maps and EDITART.EXE to view/modify/create Artwork.
Be sure to grab ETTiNGRiNDER's new EGwhaven source code modification:
At
his web site:
Here. It's a bug fixed, tweaked and feature version of Witchaven II v2.0g+. This
Expanded manual exists solely because EGwhaven was made.
Group File:
WH2 will read the Registered Maps and ART if you compile a GRP file and name it
STUFF.DAT. Any map or ART on the -outside- of the GRP
will take priority over what's in the GRP file. One who is familiar with other BUILD Games would expect the LOOKUP.DAT,
PALLETE.DAT and TABLES.DAT also to be included in the GRP file, but one or
more of those files are not read correctly by the game.
EGwhaven GAME Switch:
The
GAME parameter allows you to place your own custom .MAP files, STUFF.DAT
and (if modding is worked out for them) JOESND, F_SONGS and W_SONGS in a
subfolder, and have the game load them, while still falling back on the
default data if something is not replaced in the subfolder. It can currently
load custom maps as long as they follow the game's naming convention
(LEVEL##.MAP where ## is the level number with no preceding zeroes.)
If you have, for instance, put your levels in a subdirectory called
NEWMAPS,
you would type:
EGWHAVEN GAME NEWMAPS
The following instructions will teach you how to edit existing
Witchaven 2 maps or, create new ones. To edit a preexisting map,
type at the command prompt BUILD [level name] [ENTER]. To create a new map, type
at the command prompt BUILD
[ENTER].
There are 2 modes in the BUILD editor, the
3D EDIT MODE and the
2D
EDIT MODE.
The 3D EDIT MODE is similar to the Witchaven 2 play mode, except
with a mouse cursor. The 3D mode allows you to change the attributes
of walls, sectors and sprites. For a further explanation, refer to
the 3D EDIT MODE section.
The 2D EDIT MODE functions like a CAD program, enabling you to
create walls and sectors inside the map. You will start with an
overhead view of the map enabling you to place doors, monsters,
items and weapons.
To switch between the two EDIT MODES, press [ENTER on the numeric
keypad].
To Load, Save or Quit from the Level Editor, press [ESC] in the
2D
MODE then press the appropriate key.
SAVING MAPS
If you wish to add a new map to the 15 that already exist, you must
save it as LEVEL##. You may rename any of the 15 levels, just make
sure that level15.map is the last number in the sequence. Also you
can number levels up to LEVEL999; If you make sure to give every map set a
unique sequence of level numbers (and have a batch file to correctly select the
starting map number) it is possible for quite a few maps and sequenced sets to
coexist.
PLAYING NEW MAPS
If you wish to play or test a map you just created, save it as:
LEVEL#. The numbers must be greater than 15. When you want to play
it, just type in WH2_MAP_## (_ signifies a space, # signifies the
number). Remember that
you must also refer to the
2D & 3D EDIT MODE sections to fully
understand how to create a map.
SCREEN SHOT
The key [F12] saves a .PCX screen shot. Use [SHIFT F12] to save the 2D Mode
inversed; black background becomes white, white grid lines becomes black.
INFO ON CURRENT SECTOR
Use the [TAB] key to show detailed information about the current sector the cursor
is in.
INFO ON CURRENT WALL OR SPRITE
Use [ALT TAB] keys to show detailed information about the current wall or sprite the cursor
is on. *Note, to get around the Windows conflicting keys, select a sprite or
wall and apply a temporary high tag to it with [ALT H], BUILD will then
display the information in the status area.
The 2D mode is used to create or edit walls, floors and ceilings
inside a level. These sectors can be used to create pits, stairs,
doors, or anything imaginable item that is raised or lowered from a
ceiling, wall or floor. Remember that you must also refer to the
3D
EDIT MODE section to fully understand how to create a map.
MOUSE: This allows you to move around the orange cross hairs
enabling you to create walls and sectors and to insert tags.
LMB (left mouse button)
This button allows you to move sector points, insert points and move
sprites. Hold down the (LMB) to move any object and release the button
to drop the sector point or object.
RMB (right mouse button)
This button allows you to move the
3D map arrow. The white arrow
signifies the location and direction you will be placed inside the
3D EDIT MODE (when the [numeric ENTER key] is pressed). To move
around freely on the map editor area, hold down the (RMB) while moving
the cross hair.
MOVEMENT: The arrow keys will move the white arrow on the map in the
appropriate direction. Holding the [SHIFT] Key will speed up your
movement.
ZOOM: To zoom in and out in the
2D mode, press [A] or [Z] keys.
GRID RESOLUTION: To change the Grid Resolution, press [G]. It can be
changed into 6 different sizes. Default size is Grid three. Grid points are places where horizontal and
vertical lines meet. These grid points are used to place points evenly.
The
largest grid size is approximately equal to a 5 square foot area space. (64X,Ypixels
point to point.)
GRID LOCKING: To turn Grid locking off (white cursor) so you can place a point or sprite off
the grid, Use the [L] Key to turn it off. Then again to turn it back on (red
cursor) when your
completed with your off grid construction.
BLINKING LINE: A blinking line is the closest line to the cross
hairs. This is used to signify that it is active and will receive a
point or can be made into a circle. Also there is a little dot on
the line that moves with the cross hair, it's useful for small jobs where you
need to know exactly where your pointing.
The following section will describe how to create red and white
sectors. A red sector is best described as an area consisting of red
lines, that can be raised or lowered inside 3D mode. A white sector
is best described as a white lined area, acting as solid walls that
cannot be passed through. When building a map, remember that the
outer walls of the map must always be white, confining the player to
that map.
WHITE SECTORS: The [SPACE] places a point on the grid block closest to
the cross hair. A white line will be made following the cross hair
until another point is made by pressing [SPACE]. A sector can only be
finished by connecting it to another point or the original point,
but only after two points have been made. You may split another
sector by connecting two points within that sector. The rules for
building white sectors are as follows:
1) YOU MUST CREATE FROM THE OUTSIDE IN.
2) You must create a room first, then stairs, pillars and doors etc.
3) You cannot place a red sector around a pillar that is already
inside a room. Create the red sector first, then create the white
sector pillar inside the red sector.
CHANGING A WHITE SECTOR TO A RED SECTOR: A white sector can be
changed into a red sector by placing the cross hair inside the
desired sector and pressing [ALT S]. The sector will change to a red
sector if it is not the outermost white sector on the map.
DELETING WHITE SECTORS: Large complex areas of white sectors can be
deleted by placing the cross hairs inside the desired sector to be
deleted and pressing [RIGHT CTRL DEL]. Be very careful, doing so can (at
times) delete sectors attached and/or inside the sector you are
deleting. Deleting many sectors at the same time; Select sectors
with the [RIGHT ALT]. Then press [RIGHT CTRL DELETE] on any highlighted sector to delete all
the selected sectors. This will of course delete Red Sectors as well.
RED SECTORS: After a white sector has been made, you can turn it
into a red sector by placing the cross hair inside the desired
sector and pressing [ALT S] Red sectors are different than white
sectors since they can be raised and lowered inside the 3D mode. The
rules for building red sectors are as follows:
1) YOU MUST CREATE FROM THE OUTSIDE IN.
2) The outer wall must be a white sector.
3) Red sectors are automatically made whenever you join two existing
White sectors with a new line.
CHANGING A RED SECTOR TO A WHITE SECTOR: Any red sector can be made
into a white sector by placing the cross hairs inside the desired
sector and pressing [CTRL DEL].
BLOCKING RED SECTORS: You may make any wall of a red sector
blocking. To do so, make sure the desired line is blinking and press
[B]. The color of the line will change from red to purple. This will
not allow a person or a character to walk pass this line. Whole
sectors can become blocking by repeating this procedure. You may
reverse a line to non-blocking by repeating the process again. [SHIFT
B] Blocks only one side of a two-sided wall. This enables the player
to walk through the wall in one direction only.
DELETING RED SECTORS: First change it to a White
Sector with [CTRL DEL]. This will also delete the Tags placed in the
sector. Next Drag the points of each line onto each other until it
collapses to one point, this deletes it.
JOINING SECTORS: You may combine two sectors of the same color as
long as they are touching. To do so, place the cross hair inside the
desired sector you wish to keep and press [J]. Then place the cross
hair inside the other sector and press [J] as well. The attributes
(such as the wall tile, height and any tags) of the first sector
will be transposed into the second one . Press [ESC] twice at any time
to eliminate the joining feature if need be. Whole red sectors can
be deleted in the same fashion, just remember that the first sector
will copy its attributes into the second sector.
CREATING A POINT ON A LINE: To create a point on an existing line
press [INSERT]. A point will be placed on the blinking line on the
closest grid point. A point can be placed, then moved, by (holding
down the LMB) and releasing it on the desired location. The rules for
creating a point are as follows:
1) You can only create a point on a blinking line.
2) Points will only be placed on the closest grid point.
3) All points stick to the closest grid point.
4) Points are deleted when they meet.
DELETING A POINT: A point can be deleted by picking it up (holding
the LMB) and moving it over another point and releasing the (LMB). If
you are making a white sector, use [BACKSPACE] to delete the last
point already plotted before the sector is finished. You may delete
lines, walls and sectors by doing this continuously.
GROUP CUT AND MOVE: This is great for separating sectors
from each other and perhaps join them some place else. You can completely surround any sector you
wish to pluck. Once selected, you can drag the mess of
sectors with the mouse to where you want them. To do so, hold down the [RIGHT
ALT] key and drag the mouse, a green box will form, release [RIGHT ALT].
Now drag away the sectors. Once you have done a sector select, you can also press the [<] or [>]
keys to rotate the selected sectors. Hold down the [SHIFT <] or [SHIFT >] keys to get fine
angle rotation. If your going to move and join sectors make sure you already
have matching points on the destination wall sector. You may preview how the
joining sectors look before stamping the sector by going into 3D Mode with the [NUMERIC
ENTER] key and looking around. When finished moving, rotating and previewing,
in 2D Mode press the [RIGHT ALT]
key again to stamp the sectors.
GROUP DRAG: By holding down the [RIGHT
SHIFT] a purple box will move
with the cross hair. Use the box to highlight the points you wish to
group drag for easy movement. The points collected inside a group
drag will be blinking, and can all be moved by moving any one of the
points. Once the group drag move is finished, press [RIGHT SHIFT]
again to deactivate.
GROUP DRAG BY POINTS: This will allow you to
highlight points on a loop. Move the mouse cross hair to one of the
lines of the sector and use [CTRL RIGHT SHIFT] this will highlight the
points on a loop. The points collected will be blinking. You may now move the
sector freely with the (LMB). Once the group drag move is finished, press [RIGHT SHIFT] to
deactivate.
SPLITTING SECTORS: Sectors can be split by connecting to points
between the two sectors. If there are no points, place the cross
hair over the desired line of the sector and press [INSERT]. Do the
same for the other sector, then place the cross hair on one of the
points, press [SPACEBAR]. Move the cross hair to the other point and
press [SPACEBAR] to split the sector.
CREATING CIRCLES: To create a circle, place the cross hair near the
desired wall so that it blinks. Press [C] and a small + will appear
along with yellow points representing the circle. You may add or
delete points with the [Numeric +] or [Numeric -] keys. You may move the +
with the cross hair. Once the desired size, shape and amount of
points are correct, press [SPACE] to finish the half circle. Repeat
this process to the other side of the wall to make a complete
circle. You may cancel the creation of a circle by pressing [C] again.
To create a separate circle sector, follow the steps below:
1) Create a triangle.
2) Place the cross hair near the long perpendicular line so that it
blinks and press [C], then adjust the circle and press [SPACE].
3) Pick up and drag the farthest point and drop it to make a half
circle.
4) Make another half circle with the last long line to complete the
full circle.
Sprites are one tile items that can be in the form of creatures,
pull chains, potions, items and almost any tile available inside the
art file. You may do the following functions to sprites in 2D mode
as long as the cross hair is directly on top of the sprite or the
area you wish to place the sprite. Refer to PLACING SPRITES IN 3D
MODE for more detail.
PLACING A SPRITE
[S] Placing a sprite.
Once a sprite is placed, the stick pointing out from the round dot
indicates the sprite’s direction.
DELETE A SPRITE
[DEL] Deleting a sprite.
ROTATING A SPRITE
<> Rotating a sprite. Hold [SHIFT] to fine rotate 1 degree at a
time. The direction of a sprite is
important when placing creatures or pull chains since it should
always face the player, especially when they are flush against the
wall.
BLOCKING A SPRITE
[B] Repetitively to make it blocking or non-blocking.
A Blue sprite is non-blocking, purple is blocking.
HITSCAN A SPRITE
[CTRL H] key toggles Hitscan; The sprite will let
projectiles hit it, blocking it from passing threw, even if it doesn't block the
player. In 2D Mode the sprite stick will be double the thickness to indicate
this.
TAG A SPRITE
[ALT T] Place a low tag on a sprite (only certain sprites can be
tagged).
[ALT H] Place a high tag on a sprite (only certain sprites can be
tagged).
COPY A SPRITE: Method:
2D Mode Window. Coping
sprites alone if fairly easy. When you copy and paste the sprite it will also
copy the sprites size, shading, hitag, lotag and height.
1) Go into 2D mode and move the mouse crosshair just above and to the left of
the sprite or group of sprites you want to be copied.
2) Press down the [RIGHT SHIFT] key and hold it as you drag the window with the
mouse over the sprite to surround it. Be sure your not highlighting any vertices
or they will get dragged. Now release the [RIGHT SHIFT] key, the sprite is now
ready to be pasted somewhere else.
3) Once you have the sprite or group of sprites copied into memory, press the
[INSERT] key. This will paste the sprite one time, stacking it under the
original sprite. Keep using the [INSERT] until you have all the sprite you want.
Then drag each sprite off of the other to a location you want.
Tags are numbers assigned to red sectors and/or sprites that make
the tagged red sector perform a specific task such as open door,
lower/raise a wall, trigger a trap etc.. There are two types of tags
each described below, low tags and high tags. A tagged sector or
sprite will have numbers in the middle of the red sector or on the
sprite. The first number represents the high tag, the second is the
low tag.
TAG A WALL: Move the crosshair
over or near the wall to be tagged. Use the [ALT T] keys to place a low tag on a
wall. Use the [ALT H] keys to place a high tag on a wall.
LOW TAGS: A low tag forces the red sector or sprite to perform a
specific function. To assign a tag, place the cross hair inside the
desired red sector and press [T]. Enter one of the numbers below to
assign a function to the red sector you are tagging. Moving sectors
will operate only once when triggered and will stay in the final
position.
Moving Red Sector Low Tags
Requires a pull chain or a Red Sector floor plate to trigger movement. (for Low
Tag XXYY, YY tells the game how many groups of pixels to move the floor/ceiling).
(Each group is 4 pixels):
1101-1199 Lower Floor any amount 11## groups down.
1201-1299 Raise Floor any amount 12## groups up.
1301-1399 Lower Ceiling any amount 13## groups down.
1401-1499 Raise Ceiling any amount 14## groups up.
1501-1599 Lower Floor and Ceiling both any amount 15## groups down.
1601-1699 Raise Floor and Ceiling both any amount 16## groups up.
Complex Doors With Keys
To create a door, low tag a red sector with a 6,7 or 8 according to
the type of door you desire. If you wish to make it a locked door,
follow the door number with a 1,2,3 or 4 according to the desired
key color. A splitting door locked with a black key will be low
tagged 82. A door low tagged with a single digit number (6-8) will
function every time a player presses [SPACE] unless it is locked or
linked with a high tag (see HIGH TAGS for more info).
| 6 Raising Door |
1 Brass Key |
4 Ivory Key |
| 7 Dropping Door |
2 Black Key |
|
| 8 Horizontal Splitting Door |
3 Glass Key |
|
SPRITE TRAP LOW TAGS: A low tag on certain sprites will make the
sprite perform a specific task. To assign a low tag to a sprite,
place the cross hair over the sprite and press [ALT T]. The following
is a list of low tag traps for sprites and the specific tile numbers
that can use a low tag. (Note: Traps with a pull chain does not
function in WH2 v2.0c or v2.0g, however in EGwhaven they finally work.)
| Fireball |
Tile# 1717 |
Low Tag 90 |
| Shooting Arrows |
Tile# 1957 |
Low Tag 91 |
| Shooting Darts |
Tile# 1957 |
Low Tag 92 |
| Shooting Javelins |
Tile# 1957 |
Low Tag 93 |
| Shooting Pikes |
Tile# 1957 |
Low Tag 94 |
Once a trap low tag is assigned to a sprite, make sure that the
stick portion of the sprite is pointing in the direction you wish
the projectile to travel. Please refer to the 3D MODE SPRITES for
more information on how to place a sprite.
ACTIVATING SECTORS: In order
for any moving sector, trap or door to function, it needs an activating
sector, along with a corresponding high tag number, to make it operate.
An activating sector is a low tag with a number 1. An active sector is a
red or white sector
on the ground acting as a pressure plate that will trigger a trap, door, or a
moving sector to function properly. The activating sector is low tagged with a number 1 (one) Indicates ACTIVATE or 2 (two)
Indicates ACTIVATE ONCE. It must also have a
high tag corresponding to the same high tag number of the trap, door
or moving sector. Please refer to the EXAMPLE.MAP for an example of
activating sectors. The rules for creating an activating sector are
as follows:
1) The sector created must be a red sector (or white sector) on the floor in a place
where the player will step on it for it to function.
2) The activating sector must be low tagged with a 1 (one) or 2
(two) Indicates ACTIVATE ONCE.
3) The activating sector must have a high tag number (that you
create) corresponding to the door, trap and/or moving sector.
4) More than one activating sector can be placed for any item that
it will activate and vice versa.
5) An active sector will trigger the linked item every time it is
stepped on. Items such as doors and traps will function every time the active
sector is stepped on unless low tagged with 2, in which it will only function
once.
Please refer to the HIGH TAG section to understand how activating
sectors work along with high tags.
ACTIVATING SPRITES: An activating sprite is a pull chain placed on a
wall that can be pulled by the player (using the spacebar) to
activate a sector, open a door and/or trap. The sprite being placed
must be one of the two sprites that act as pull chains (tile number
370 and 539), Breaking Glass can also be used as a switch. Once the correct tile number is selected, place the
cross hair over the sprite and press [ALT T] and enter 1 (one) for the
low tag number pressing [ENTER] when finished. You must also give the
activating sprite a high tag number that is the same as the moving
sector, trap and/or door high tag. Do this by placing the cross hair
over the sprite and press [ALT H] and create a number from 1 to 999
that corresponds to the moving sector, trap and/or door. See HIGH
TAGS for more information. The rules for placing an activating
sprite are as follows:
1) A sprite must be placed facing away from the wall, blocking, non
rotating flush against a wall.
2) The sprite must have a low tag of 1 and a high tag that
corresponds with the item(s) it will activate.
3) The activating sprite must be a tile numbered 370 or 539, the
pull chains. Breaking Stained Glass works too.
4) Activating sprites can only be used once. A pull chain can never
be pulled or used twice.
HIGH TAGS: A high tag is a number that you create that is identical
to the activating sector and the item it will activate (door, trap,
or moving sector). Think of a high tag as a link between the
activating sector and the functioning item. The activating sector
will trigger the link to activate a door, trap, or moving sector.
You may have one floor trigger or pull chain activating many items.
There is no limit to the number of items to which an activating
sector and a high tag can be linked. You may also have many
activating sectors or sprites linked to one item. The rules for
using high tags are as follows:
1) A door (low tags 6-8), once high tagged, can only be opened by an
activating sector or pull chain. A door requiring a key cannot have
a high tag.
2) Remember that doors and traps will function every time an
activating sector is stepped on or only once when a pull chain is
used.
3) More than one activating sector and/or pull chain can activate
something and more than one trap, door and/or moving sector can be linked to a
single high tag-activating sector or sprite.
Please refer to the CREATING SPECIFICS section for examples of using
Tags.
WARPING SECTORS: There are two different types of warping sectors,
sector-to-sector warps (inside the same map) and level-to-level
warps (ending one level to start another).
SECTOR-TO-SECTOR WARPING (TELEPORTER)
Sector-to-sector warping consists of two red sector squares
(preferably one square in size of the largest grid resolution)
placed on the same map having a low tag of 10 and identical high tag
numbers. In Game the sector will glow to indicate that its a
Teleporter.
ONE WAY SECTOR-TO-SECTOR WARPING
A one way sector-to-sector warp is made with two red sector squares
as well. The only difference is the low tag on the receiving it 14
and the low tag of the sending sector is 10. Place an identical high
tag on both of the sectors as well.
LEVEL-TO-LEVEL WARPING (WARP
TO NEW LEVEL)
A level-to-level warping sector is made with a red sector square, a
low tag of 4002 and a high tag of 1. Make sure that a pentagram
sprite is placed somewhere on the map since it is essentially a key
that activates the level-to-level warping sector. A transparent
non-blocking pentagram sprite should be placed on the level-to-level
warping sector just created to make the player aware of the level
warping sector.
STARTING POINT: Each map created needs to have a starting point
inside one of the rooms. Place the white arrow on the desired place
you wish to make the starting points and press [SCROLL LOCK]. An
orange stationary arrow will signify your starting location whenever
the map is played as a game level. Every time you press [SCROLL
LOCK] the orange arrow will disappear and reappear in the new
location. Make sure its in a valid position (inside a sector) or the
game will crash when the map is loaded. *There is a bug in the BUILD Editor that changes your
starting point once you go into 3D Mode and modify something and you return to
2D Mode you'll see that the starting point changed.*
PLAYING NEW LEVELS: If you wish to play or test a map you just
created save it as: LEVEL#. The numbers must be greater than 15.
When you want to play it, just type in WH2_MAP_## (_ signifies a
space, # signifies the number).
The 3D mode is used to move and manipulate walls, sprites and
sectors inside a level. 3D mode is very similar to game-playing mode
except that none of the sprites (enemies or objects) move and you
have the ability to control your height in terms of floating and
hovering. Most of your detailed level designing will occur inside
the 3D mode. Keep in mind that you will often have to switch between
2D and 3D mode to create the perfect item in a room, let alone a
whole room.
ARROWS: The arrow keys will move you in the appropriate direction
inside the 3D mode. Holding the [SHIFT] Key will speed up your
movement.
VERTICAL CONTROL MODE: There are three different types of vertical
control modes available. Every time the [CAPS LOCK] is pressed, it
will toggle you between one of the three different modes of vertical
control. Remember that every time you enter into 3D mode, you will
always start in mode 1 until [CAPS LOCK] is pressed, switching you
to mode 2, then to mode 3 and back to mode 1.
MODE 1: This mode is almost like the game mode, allowing you to
walk at the normal eye level, under and over any red sector area.
This is the easiest mode to use while manipulating most of the
objects and it is also the default mode.
MODE 2: This is the height lock mode, keeping you at the same height
above the ground no matter how high or low some red sectors are.
MODE 3: This is the float mode that allows you to “hover” in the air
and move with no vertical movement unless you adjust it. This is the
best mode to manipulate any tall object or sectors on the ceiling.
VERTICAL MOVEMENT: Using the [A] and [Z] keys allows you to move up or
down inside any of the three vertical modes.
VERTICAL VIEWING: Holding down [CTRL] and using
[A] and [Z] allows you to
tilt your view looking up or down with no horizontal or vertical
movement.
MOUSE: Movement with the mouse controls the white cross hair. The
white cross hair always points to the item that is being controlled.
The sector under control can be raised or lowered, moved or fitted
with different artwork. The mouse will be used with many different
keys allowing you to manipulate the environment inside 3D mode.
LOCKING SECTORS: Holding down the Left Mouse Button (LMB) allows
you to lock a sector at which the cross hair is pointing to so the
sector can be moved up or down, even though the cross hair is no
longer pointing at it. This is extremely important when moving
sectors out of sight, knowing, they are still under your control.
RAISING OR LOWERING SECTORS: Use the [PAGEUP] or [PAGEDOWN] keys to
move a red sector up or down. Remember that the sector being moved
needs to be either pointed at with the cross hair or locked with the
(LMB)
before being moved. Each press of the key is 4 pixels (?? Feet or ?? inches). Each pixel would be
?? FT. (or ?? inches)
GROUP SECTOR MOVE UP / DOWN: This will let you move a whole
section of a board up / down quickly. First you select a bunch of sectors with
the [RIGHT ALT] key in 2D mode. Then switch to 3D mode and if you press [PAGEUP]
or [PAGEDOWN]
on any of the highlighted sectors, the rest of the highlighted sectors will move
also.
DIMENSIONS: Each time the [PAGEUP] or [PAGEDOWN] is pressed a sector
is raised or lowered by 4 pixels. It takes 16 key presses (64 Zpixels) to make a full
tile. A full tile is about equal to approximately a
5 square foot area in real
space. Remember this measurement when building in 3D mode.
Create most of the rooms at least 20-24 key presses (80-96 Zpixels) high so the creatures
(sprites) can move about freely and so that everything is in
proportion to real size. Artwork on some tiles larger than 16 key
presses (64 Zpixels) in size will look distorted and not in proportion, so keep this in
mind when building. Note: The player character is just about 17 key
presses tall.
SWITCHING BETWEEN 2D & 3D MODES: Use the [NUMERIC ENTER] key to
switch between 2D and 3D modes.
TILE ARTWORK: The default tile used on a newboard is always the red
square with a yellow circle. With this tile, it is easy to see the pixels of height
(64 pixels), allowing you to build evenly. A good suggestion is to build a level
using the red and yellow tile exclusively, then changing the tiles once a
majority of the area has been manipulated. To change the artwork on any given
tile press [V]. The first page will show what tiles have been currently used on
the map. Use the arrow keys to move the white box around so that it highlights
the desired tile you wish to choose. If the tile is not shown (it probably has
not been used), press [V] again to display all of the tiles available. You may
also use the [PAGEUP] or [PAGEDOWN] keys to move through a whole screen or
artwork. To make the view size larger or smaller on the tile selection screen, use the [NUMERIC /] or
[NUMERIC *]. Keep in mind that the tile being highlighted is the starting point for
entire page of artwork. Use the arrow keys to move the highlight box and press
[ENTER] to select the desired tile to place in 3D mode. The rules for placing tiles in 3D
mode are as follows:
1) Have the cross hair pointing to the desired sector you wish to
place the artwork on before pressing [V].
2) It is faster to move around the artwork area if you know the
location of the desired artwork and highlight a tile that is close
to the art you desire, before pressing [V] for the second time.
3) Some tiles are not meant to be placed as artwork on sectors. Any
artwork in the form of a person, object or creature should not be
placed on a sector. This type of artwork usually has a bright red
background and is meant to be placed as artwork for a sprite since
the bright red area will become transparent in the game.
GET TILE QUICKLY: While changing the tile, if you
know the number of the tile you want, Press the [G] Key and enter the number ([BACKSPACE] to delete the
number showing first) of the tile you wish to use and press [ENTER].
SLIDING ARTWORK: If you
wish to slide the art of a tile up, down, left or right to align it to another
tile in another sector, place the cross hair on it and press one of the
[SHIFT numeric 2,4,6 or 8]. The [NUMERIC 5] Key
speeds up the sliding, every eighth panning value.
The [/] key resets the panning values to 0.
SHRINKING OR STRETCHING ARTWORK: A
tile on a wall or sprite can be stretched or shrunk by pointing to it with the cross hair
and pressing the [NUMERIC 2,4,6 or 8] keys. The [NUMERIC 5]
Key speeds up shrink and stretch, every eighth panning value. The [/] key resets the
stretching values to default. For the ceiling or floor these keys just slide the
texture, enabling you to align it accurately. The textures on a ceiling or floor
can only be resized using [E].
AUTO ALIGNING TILES: You may align many sector
walls with the same tile all at
once by pointing to the left most sector with the cross hair and
pressing the period key [>]. This is useful when you have many
divided walls or when making windows.
RESET TILE ARTWORK: You may reset the size of the artwork on a tile
or sprite by using slash [/] on the desired tile. If you hold down
[SHIFT /] on a sprite, it will give the sprite a square aspect ratio.
FLIP ARTWORK: You may flip the artwork on a tile or sprite by
pressing [F]. Repeatedly hitting the [F] Key you can flip a
floor or ceiling eight different ways. Walls and Sprites can only be flipped
four ways.
ARTWORK ORIENTATION: Artwork
Orientation is important if you wish to
have the artwork start at the top of a sector or at the bottom of a
sector. This is important if the sector raises or falls since the
artwork will not move with the tile once it is activated. Place the
cross hair on the desired tile you wish to orient and press the oh [O]
Key.
ENLARGE TILE: Toggles the
tile size of floors and ceilings between normal and enlarged. To Expand the artwork on a
tile, place the cross hair on it and press [E]. Press [E] again to reverse the
process to default size.
ARTWORK RELATIVE ALIGNMENT: To change the Relative artwork alignment on a
tile (floor/ceiling) or sprite, press [R] consecutively. It
will change from relative to normal. Textures will
then rotate and pan with moving sectors properly. This will
align to the first wall in the sector. To change a sector's first wall go to 2D
Mode and press [ALT F] on the wall which is to be assigned the first wall.
SHADING TILES: Press [numeric key pad + or
-] continuously to shade a tile.
AUTO SHADING: Make one of the walls the lighter
shade you want and another one with the darker shade you want. Move the cursor
over the lightest wall and press [CTRL SHIFT ENTER] Now all walls in
between will be smoothly shaded. If they are not smoothly shaded, you may need to insert
more points on the walls.
GROUP SECTOR SHADING: This will let you
shade a whole
section of a board quickly. First you select a bunch of sectors with
the [RIGHT ALT] key in 2D mode. Then switch to 3D mode and if you press [NUMERIC
+]
or [NUMERIC -]
on any of the highlighted sectors wall, floor or ceiling and the rest of the highlighted sectors will
shade
also.
VISIBILITY OF THE CURRENT SECTOR: [ALT
NUMERIC + -] keys changes the visibility of the current sector, the sector the
cursor is pointing at. (how fast it
darkens with distance). [ALT SHIFT NUMERIC + -] changes visibility in finer
steps. Darker shading will intensify this as will the games own
diminishing lighting for distant walls. Use with care.
VISIBILITY OF THE ENGINE: [ALT CTRL NUMERIC
+ -] keys changes the build engine editors built-in default visibility, its own
diminishing lighting. This does NOT save with the map. I would say it's only
useful to try to match the games own default visibility, since the editor
visibility is not as "dark" as the games. (this needs to be fixed so the game
and editor use the same visibility) It ranges from 5 (darkest) to 17
(lightest) and it starts at 13.
COPY ATTRIBUTES: If you wish to copy and paste attributes of one
tile to another (ie. size, block, 1-way wall, orientation, artwork,
x-flipping, shading etc.), Note: The copy [TAB] function in BUILD doesn't copy masked walls attributes.
Place the cross hair on the desired tile and press [TAB].
This will copy the attributes in a buffer allowing you to paste
them.
PASTE ATTRIBUTES: To paste the attributes just copied (see above)
move the cross hair to the desired location and press [ENTER].
MASS PASTE: To paste the attributes
from the tab buffer on an entire
sector of walls that are connecting, press the [RIGHT CTRL ENTER]
together. Use this to change the appearance of a whole room at once.
SHADE PASTE: To paste only the shade of a tile to another, copy the
desired tile with [TAB] and press [SHIFT ENTER] to paste the shade
only.
MASS REPLACE: Changes all
tiles on the whole map from the tile in
the tab buffer. To use, move the mouse cross hair over the tile you
want to copy and press the [TAB] Key. Next point the mouse
cross hair at the tile type you want to replace through out the map.
Then press the [LEFT ALT C]. All tiles will be replaced on
the entire map from the tab buffer.
PARALLAXING SKY: To make a sky (or floor) tile appear to look like an outdoor
scene (ie: the sky stays stationary as the player moves), point to
the ceiling tile that is a sky and press [P], press again to undo.
[CTRL ENTER] will paste parallaxing sky tiles to all neighboring
parallaxing sky areas. The rules for making a
sky tile parallaxing are as follows:
1) Only a ceiling tile may be parallaxed.
2) Only a sky tile may be parallaxed (refer to tile listing).
3) If there is more than one consecutive (touching) red sector on
the ceiling that are going to be a parallaxed sky tile, make sure
that they are all equal in height. Make them equal in height before
placing the parallaxed sky tile on them.
MASKED WALLS: Masked Walls allow you to place a tile in an opening in the wall rather than
using a sprite.
This allows up to three tiles to be placed on a wall. This useful for creating
two sided water falls as seen in WH1 Level1 or hidden areas.
Masked walls can be created only on a single red double sided wall as seen in
2D Mode. Masked walls have
two modifiable sides. To create a masked wall, start in 3D mode and choose a red
wall. To make a masked wall, you must first point the cursor at the floor or
ceiling near where the wall is dividing the sector or on an existing wall above
or below (if you have a step) and press the [M] Key. The masking wall takes all
its attributes from the front of the wall to the back. Also, the tile from the
front is also automatically added the the other side of the wall, with the tile
flipped.
HITSCAN WALLS:
Toggle hitscan pass through bit. Default is pass through on a red wall. You
can press [H] to toggle the bit. If hitscan is set to not-go through a maskable wall,
the wall will appear as a double thick red line in 2D edit mode.
ONE SIDED WALLS: Make a 1-sided wall but only possible
on a two-sided line, Press the [1] Key on the wall to create a wall which only has
a texture on one side. Creatures can see through this wall, attacking you and
walking through the wall.
TWO SPLIT WALL TILES: Some walls have two
different sections. One step on the ceiling and one step on the floor. Normally
they always have the same attributes. It is possible though, to give both the
top and bottom different attributes by pressing the [2] Key on the top or bottom wall.
Makes the two halved wall's attributes separately modifiable, like for different upper and
lower textures. Pressing the [2] Key again on the walls will make them one again.
Angles can be created only on red sector areas. Angles can be raised or
lowered from the ceiling or floor. To create an angle, start in 2D mode and
choose a red sector you wish to angle. To make an angle, you must first choose a
pivot point. A pivot point is the line that will act as a hinge as the sector is
raised or lowered in the 3D mode to create the angle. To choose a pivot point,
make the desired line blinking by placing the cross hair near the line and press
[ALT F]. A statement will appear, “This wall now sector’s first wall”. Switch to
3D mode to raise or lower the angle. Place your cross hair on the sector, and press the [ or ] keys to raise
and lower the angle accordingly. You can hold down the (LMB) if the
angle goes out of sight, but do it before it does. Use [RIGHT SHIFT] to fine adjust an angle
along with the [ or ] keys. Use [LEFT SHIFT] to very fine adjust an
angle along with the [ or ] keys. Using [ALT] and [ or
] keys auto matches the slope
with the sector next to it. Use the slash [/] Key to revert the angle to its
original flat form. The rules for creating angles are as
follows:
1) The pivot point must be the lowest point if an angle comes from a
sector on the floor. You might have to raise an angle and then raise
or lower the sector using the [ ] keys to make sure that the pivot
point is the lowest point on the floor.
2) White sectors can also be anglized in the same manner as a red
sector as long as they are part of the playing area.
3) A sector on the floor and a sector on the ceiling do not have to
share the same pivot point. To change pivot points, create a floor
or ceiling angle first, then complete the other angle separately.
4) Angles can become moving sectors as long as they are tagged
accordingly.
5) Avoid angles over 40 degrees on the floor if they can be walked
upon. This is to avoid areas that could slow down gameplay.
6) Whenever a new tile is copied and pasted onto an already angled
tile, it will lose its angled appearance and will have to be done over. Also,
whenever the [/] key is pressed, the angle will revert back to its
original flat form.
Once a sprite is placed, they can be moved
vertically, rotated, change with other artwork, and placed flush with a wall in
3D mode. Please refer to the 2D mode as well as 3D mode for
placement and the many uses for sprites.
PLACING A SPRITE: Sprites can be placed inside 2D or 3D mode by pointing to the desired
location with the cross hair and pressing [S]. Only in 3D mode, by
pressing [TAB] on the sprite makes it the default sprite to place.
RAISING LOWER A SPRITE:
Sprites can be moved in the
same way red sectors are raised and lowered by using [PAGEUP]
and [PAGEDOWN] keys. Use [CTRL PAGEUP] or [CTRL
PAGEDOWN]
to move a sprite to the ceiling or floor. The [C] Key; While in 3D Mode, Centers a Sprite to room or rest its base on the floor.
SPRITE ARTWORK: Once a sprite is placed you can change the artwork
in the same manner as a wall tile by pointing to it with the cross
hair and pressing [V]. Refer to the SPRITE AND TILE NUMBERS section
for details on the different artwork associated with magical items,
creatures and humanoid fighters.
SPRITE RELATIVE ALIGNMENT: There are three different ways a sprite can be
aligned either rotating, flat, or parallel to the floor. To change
between the three different relative alignments, press [R] consecutively.
ROTATING SPRITES
A rotating sprite is a sprite that will always have the artwork
facing the player. Whenever a sprite is placed (not copied), its
default is a rotating sprite. All enemies should be placed as
rotating sprites to avoid any wafer thin enemies from roaming the
dungeons. When using a rotating sprite that is not a moving item (ie:
treasure), make sure that the sprite is not located too close to a
wall or a moving sector to avoid any sprite clipping (sprites cut in
half) problems. When enemies are placed, the stick of the sprite
(seen only in 2D mode) needs to be facing forward so the sprite can
see the player and react accordingly.
FLAT SPRITES
Flat sprite alignment is the second selection. Flat alignment allows you to place sprites that
should not follow a character such as pull chains, bas-reliefs,
stained glass, wall rugs etc. Flat alignment allows you to place a
sprite flush to a wall by placing the cross hair on it and pressing
the oh [O] key.
Before doing so, make sure that the sprite is facing away from the
wall (viewable only in 2D mode). You can also rotate the alignment
of a flat sprite by using <> accordingly.
FLOOR SPRITES
Floor sprites is the third alignment that places the sprite
parallel to the floor. Only a few sprites can be changed to this
setting without being distorted in appearance such as a bridge tile,
stained glass etc.
ONE SIDED SPRITES: Make a 1-sided sprite but only possible
on a Flat or Floor sprites, Press the [1] Key on the sprite to create a sprite
which only has a texture on one side. (When placed on a wall by pointing at the
wall and pressing the [S] Key, they automatically become 1-sided and blocking
off for optimal performance.)
FLIP SPRITE: You may flip the sprite by pressing
[F]. Repeatedly hitting the [F] Key you can flip a sprite four different
ways. Each time is 90 Degrees clockwise.
TRANSPARENT SPRITES: There are three levels of transparency for a
sprite. The first is none and is the default of every placed sprite.
The second is limited transparency and the third is a very
transparent sprite. Use [T] to change between one of the three
different modes. Items such as the pentagram and stained glass can
be transparent.
SHADING SPRITES: To shade sprites
press [numeric key pad + or
-] continuously to shade a sprite. If you leave the sprites shade at
default, the sprite's shade will take on the floor's shading value of the
current sector.
HITSCAN SPRITES: The [H] key toggles Hitscan; The
sprite will block projectiles even if it doesn't block the player. In 2D Mode
the sprite stick will be double the thickness to indicate this.
CLIPPING FATNESS: Lets you enter a custom
value that overrides the games default. The size of the movement clipping square
of an object. Works on Rotating sprites, sprites that follow the player. If clipdist is set to 32, then the clipping radius is actually 128.
The default walldist is 128. It could be used as additional information too, you
don't need to change the value. clipdist is normally based on the tile's x size and
sprite's xrepeat at map load. Use
[ALT D] to read and/or change the value. (allows a range from 0-1020).
COPY A SPRITE: Method: 3D Mode Buffer. Coping
sprites alone if fairly easy. When you copy and paste the sprite it will also
copy the sprites size, shading, hitag, lotag and height. This method will not save the
direction.
1) Go into 3D mode and move the mouse crosshair onto the sprite you want to
copy.
2) Press the [TAB] key to place a copy of the sprite into the BUILD buffer.
3) Now you can either stay in 3D Mode and point your mouse pointer on the floor
and hit the [S] key to paste a copied sprite or you also can opt to go into 2D
mode and place the sprites where you want with the [S] key.
The rules for placing, editing and moving sprites are as follows:
1) A sprite can be placed in 2D or 3D mode.
2) A sprite can only be changed to blocking or non-blocking inside
the 2D mode.
3) Any item that is picked up (ie: treasure, items and spells) must
be placed as non-blocking sprites.
4) Any enemy placed must be a blocking sprite.
5) More than one sprite can be placed on top of each other and
moved.
6) Sprites can only receive high and low tags inside 2D mode.
7) Sprites are moved in the same manner as red sectors using the
same key commands.
8) Sprites should not be placed on moving sectors since they will
not stay with the moving sector.
9) Use the 2D mode to see which way the sprite is facing.
10) Refer to the SPRITE AND TILE NUMBER section to place animated
sprites and special tiles.
Tiles and sprites can be set to their own palette by pointing the mouse cross
hair at them in 3D Mode and pressing [ALT P] keys. You can also set the floor
and ceiling pal with the [P] Key in 2d Mode. Other than coloring a
sprite, some palettes effects a creatures behavior, see the SPRITE & TILE
NUMBERS for more info.
List of Palettes
0 Default - Midian Warrior=Red Cape
1 Orange
2 Yellow Green
- Set on DEVIL or DEVILSTAND, base HP is 60 instead of 50
3 Normal
4 Normal - Giryon Knight=Spawns Ghost
5 Normal
6 Blue
7 Red
- Set on KOBOLD, base HP is 60 instead of 20 (Red Orgre)
8 Gray
- Set on KOBOLD, base HP is 40 instead of 20 (Green(Gray) Orgre)
9 Light Red
10 Normal - Midian Warrior=Blue Cape
ALSO Set on GRONSW, deletes sprite (fixed in EGwhaven)
11 Normal - Midian Warrior=Purple Cape
12 Normal - Midian Warrior=Brown Cape
13 Black
The following is a list of sprite and tile numbers. The sprite or
tile number refers to the exact piece of artwork that needs to be
placed for that specific item. Many sprites are animated and must
have the first frame used as the artwork for the sprite in order to
function properly. To change the artwork on any given tile or sprite
press [V]. The first page will show what tiles have been currently used on
the map. Use the arrow keys to move the white box around so that it highlights
the desired tile you wish to choose. If the tile is not shown (it probably has
not been used), press [V] again to display all of the tiles available. To Get a tile quickly, Press the [G] Key and enter the number (backspace to delete the
number showing first) of the tile you wish to use from the list
below and press [ENTER]. To make the view size larger or
smaller on the tile selection screen, use the [NUMERIC /] or
[NUMERIC *].
All items that can be picked up need to be
placed as non-blocking sprites. Use the [B]
Key to turn Blocking OFF (Blue Sprite in 2D Mode)
Note: Many sprites in the game may seem oversized in the editor, but come
play time the games hard code will automatically resize the sprite, such as
Creatures/Enemies and Items/Pick-ups. Also many sprites/tiles and tags come with
there own hard coded sound effects.
SPELL
Scare 1817
Night Vision 1857
Freeze 1849
Magic Arrow 1865
Open Door 1873
Fly 1833
Fireball 1841
CREATURE
Rat 1961
Willow Wisp 2426
Skeleton 2144
Ogre 737
Imp 922
Lava Fiend 777
Mino Drake 981
Guardian 1993
Giryon Knight
2 Handed Sword 3279
Hammer 3352
Sword & Shield 3426
To make the Sword & Shield Knight spawn five ghosts when he dies, In 3D
Mode, place the cross
hair on the sprite and press [ALT P] and enter in the palette number 4. EGwhaven
spawns one ghost. The ghost(s) are immune to the nuke spell. This also means
that you can put in any enemy, set its shade value to exactly 31, and
have a shadow creature who's immune to Nuke spells.
Argothonian Clansman
Punching 3090, 3095
Pike Axe 3017
Throwing Axe 3047
Magic User
Ciraen Sentinel
Punching 2780 ,3170, 3243, 3248
Magical Bow 2750
Magic User 3602
Morning Stars 3200
Midian Warrior
Halberd 2537
Magic User 2638
Sword & Shield 2579
To place a different colored Midian Warrior, In 3D Mode, place the cross hair on
the sprite and press [ALT P] and enter in the appropriate palette
number. Palette# Brown Cape 12, Blue Cape 10, Purple Cape 11, Red
Cape (default 0).
Cirae-Argoth 3541
Whenever Cirae-Argoth is killed, she drops a Horned Skull, when you
pick the skull up the game will end (no matter where she is placed). Cirae-Argoth’s death signifies the end of the game.
Horned Skull 1502
The magic skull that ends the game. You can place one without needing to have
Cirae-Argoth in the map, if you just want an endgame sequence without including
her.
WEAPONS
Dagger 1566
Short Sword 2217
Morning Star 1582
Broad Sword 666
Wall Sword 357
Battle Axe 2026
Wall Axe 359
Quiver of Arrow 1889
Bow 1775
Wall Bow 358
Pike Axe 2038
Wall Pike 356
2 Handed Sword 229
Halberd 2046
MAGICAL ITEMS (Set to
non-blocking)
Ankh 714
Amulet of Mist 1574
Shadow Amulet 698
Leather Armor 1881
Chain Mail 1809
Plate Mail 1793
Crystal Staff 1550
Glass Skull 706
Helmet 1801
Horn 1767
Pentagram 1759
Health Potion 548
Strength Potion 549
Cure Poison Potion 550
Resist Fire Potion 551
Invisibility Potion 552
Andamantine Ring 726
Onyx Ring 730
Sapphire Ring 373
Blue Scepter 718
Yellow Scepter 722
Shields 2432, 2439, 2446, 2682
Treasure Chest 260
Wood Barrel 269
Bag of
Gold Coins 235, 236
Bag of
Silver Coins 234
Stack of Gold Coins 237, 238
Stack of Silver Coins 239
VARIOUS ITEMS and TILES
Lava1 Tile 62 (put on a floor to make it do damage)
Lava2 Tile 80 (put on a floor to make it do damage)
Health Water Tile 86 (put on a floor to make it add health)
Brass Key 1623
Black Key 1631
Glass Key 1639
Ivory Key 1647
Door Tiles 280-3, 1926-1930
Pentagram Tile 291
Enchanted Weapon Aura 449
Floor Mirror (reflective water) 182
Torch Tiles 1553, 1704, 1691, 1907
Pull Chains 370, 539
Shooting Trap Tile 1957
Spawn Fireball Tile 1717
Heart Ripper Death Spikes 461, 462, 463
Breaking Stained Glass Tiles
1079, 1086, 1093, 1100, 1107,
1114, 1121, 1128, 1135
SKY TILES
"Needs sliding" means that if you don't adjust the tile with [SHIFT NUMERIC 2],
the player can see a horizontal seam if they look up in the sector.
Thunder & Lightning
Sky 75 Needs sliding
Sky2 167 Needs sliding
Sky3 168 Needs sliding
Sky4 169 Needs sliding
Sky5 170 Needs sliding
Sky6 171 Needs sliding
Sky7 172 Needs sliding
No Effect
Tile 202 Needs sliding
Tile 203 Needs sliding
Tile 210 Needs sliding
Tile 211 Needs sliding. Has a vertical black seam.
Standard
Tile 233 No adjustment required
Tile 241 No adjustment required
SPRITE DOOR TILES
SWINGDOOR Tile 324
SWINGDOOR2 Tile 325
SWINGDOOR3 Tile 326
TALLSWING Tile 385
TALLSWING2 Tile 386
SWINGHOLE Tile 476
SWINGGATE Tile 477
SWINGGATE2 Tile 478
SWINGGATE3 Tile 1788
SWINGGATE4 Tile 1897
SWINGGATE5 Tile 1898
ROPEDOOR Tile 282
GEARSSTART Tile 467
WOODGEARSSTART Tile 483
GEARS2START Tile 1497
SQUAREGRATE Tile 490
ACTIVATED SPRITES
The following can be triggered by floor sector or pull chain (EGwhaven)
activation. High Tag is custom and equal to activating sector or chain.
Come to Life (no Low Tag required)
STONEGONZOCHM Tile 2483
STONEGONZOGSH Tile 2484
STONEGRONDOVAL Tile 2485
STONEGONZOBSW Tile 2486
Jump Out (needs a Low Tag of 1)
GONZOHMJUMP Tile 3630
GONZOSHJUMP Tile 3636
Shatter (needs a Low Tag of 2)
STAINGLASS1 Tile 1079
STAINGLASS2 Tile 1086
STAINGLASS3 Tile 1093
STAINSKULL Tile 1660
STAINHEAD Tile 498
STAINSNAKE Tile 499
STAINCIRCLE Tile 451
STAINQ Tile 180
STAINSCENE Tile 1658
WH2 Sound List for SNDLOOP ambience sprite Tile 2369 (EGwhaven only): This is
a feature that's introduced in WH1 and is disabled in WH2. It is now
partially Enabled in EGwhaven with limited function; A sound will play but
will not loop. This problem will be looked at in future updates of
EGwhaven. To SNDLOOPOFF (End Loop) use Tile 2370. Also use SNDEFFECT
Tile 2368 to play a sound once.
| |
|
|
|
| THUNDER1 |
0 |
PUSH1 |
85 |
| THUNDER2 |
1 |
PUSH2 |
86 |
| THUNDER3 |
2 |
PLRPAIN1 |
87 |
| WINDLOOP1 |
3 |
PLRPAIN2 |
88 |
| WAVELOOP1 |
4 |
GORE1 |
89 |
| LAVALOOP1 |
5 |
GORE2 |
90 |
| FIRELOOP1 |
6 |
GORE1A |
91 |
| STONELOOP1 |
7 |
GORE1B |
92 |
| BATSLOOP |
8 |
DEADSTEP |
93 |
| PLRWEAPON0 |
9 |
HEARTBEAT |
94 |
| PLRWEAPON1 |
10 |
SOFTCHAINWALK |
95 |
| PLRWEAPON2 |
11 |
SOFTCREAKWALK |
96 |
| PLRWEAPON3 |
12 |
LOUDCHAINWALK |
97 |
| PLRWEAPON4 |
13 |
SCARYDUDE |
98 |
| KSNARL1 |
14 |
WATERY |
99 |
| KSNARL2 |
15 |
GLASSBREAK1 |
100 |
| KSNARL3 |
16 |
GLASSBREAK2 |
101 |
| KSNARL4 |
17 |
GLASSBREAK3 |
102 |
| KPAIN1 |
18 |
TREASURE1 |
103 |
| KPAIN2 |
19 |
SWORD1 |
104 |
| KDIE1 |
20 |
SWORD2 |
105 |
| KDIE2 |
21 |
SWORDCLINK1 |
106 |
| DEMON1 |
22 |
SWORDCLINK2 |
107 |
| DEMON2 |
23 |
SWORDCLINK3 |
108 |
| DEMON3 |
24 |
SWORDCLINK4 |
109 |
| DEMON4 |
25 |
SOCK1 |
110 |
| DEMON5 |
26 |
SOCK2 |
111 |
| DEMONDIE1 |
27 |
SOCK3 |
112 |
| DEMONDIE2 |
28 |
SOCK4 |
113 |
| MSNARL1 |
29 |
KOBOLDHIT |
114 |
| MSNARL2 |
30 |
FIREBALL |
115 |
| MSNARL3 |
31 |
PULLCHAIN1 |
116 |
| MSNARL4 |
32 |
PICKUPAXE |
117 |
| MPAIN1 |
33 |
EXPLODE |
118 |
| MDEATH1 |
34 |
BARRELBREAK |
119 |
| RIP1 |
35 |
WARP |
120 |
| RIP2 |
36 |
PICKUPFLAG |
121 |
| RIP3 |
37 |
DROPFLAG |
122 |
| SKELHIT1 |
38 |
LAUGH |
123 |
| SKELHIT2 |
39 |
DRINK |
124 |
| SKELETONDIE |
40 |
PAGE |
125 |
| SKELSEE |
41 |
BOTTLES |
126 |
| GUARDIAN1 |
42 |
CRACKING |
127 |
| GUARDIAN2 |
43 |
PLRDIE1 |
128 |
| GUARDIANPAIN1 |
44 |
AGM_ATTACK |
129 |
| GUARDIANPAIN2 |
45 |
AGM_PAIN1 |
130 |
| GUARDIANDIE |
46 |
AGM_PAIN2 |
131 |
| WISP |
47 |
AGM_PAIN3 |
132 |
| WISP2 |
48 |
AGM_DIE1 |
133 |
| SPLASH1 |
49 |
AGM_DIE2 |
134 |
| SPLASH2 |
50 |
AGM_DIE3 |
135 |
| SPLASH3 |
51 |
GRONDEATHA |
136 |
| SPLASH4 |
52 |
GRONDEATHB |
137 |
| SPLASH5 |
53 |
GRONDEATHC |
138 |
| WILLOWDIE |
54 |
HGM_DIE1 |
139 |
| JUDY1 |
55 |
HGM_DIE2 |
140 |
| JUDYDIE |
56 |
HGM_DIE3 |
141 |
| CHAIN1 |
57 |
GRONPAINA |
142 |
| FLAME1 |
58 |
HGM_PAIN1 |
143 |
| CLUNK |
59 |
HGM_PAIN2 |
144 |
| DEMONTHROW |
60 |
FIRESWING |
145 |
| DOOR1 |
61 |
FIREWEAPONLOOP |
146 |
| DOOR2 |
62 |
ENERGYWEAPONLOOP |
147 |
| DOOR3 |
63 |
ENERGYSWING |
148 |
| CREAKDOOR1 |
64 |
BIGGLASSBREAK1 |
149 |
| CREAKDOOR2 |
65 |
BIGGLASSBREAK2 |
150 |
| CREAKDOOR3 |
66 |
BIGGLASSBREAK3 |
151 |
| STING1 |
67 |
IMPGROWL1 |
152 |
| STING2 |
68 |
IMPGROWL2 |
153 |
| POTION1 |
69 |
IMPGROWL3 |
154 |
| GENTHROW |
70 |
IMPDIE1 |
155 |
| GENSWING |
71 |
IMPDIE2 |
156 |
| ARROWHIT |
72 |
SWINGDOOR |
157 |
| WALLHIT1 |
73 |
NUKESPELL |
158 |
| GONG |
74 |
DOORSPELL |
159 |
| SPELL1 |
75 |
FIRESPELL |
160 |
| FREEZE |
76 |
GENERALMAGIC1 |
161 |
| FREEZEDIE |
77 |
GENERALMAGIC2 |
162 |
| TRAP1 |
78 |
GENERALMAGIC3 |
163 |
| TRAP2 |
79 |
GENERALMAGIC4 |
164 |
| RATS1 |
80 |
HAWKSOUND |
165 |
| RATS2 |
81 |
OWL SOUND |
166 |
| WINDLOOP2 |
82 |
STEPSSOUND |
167 |
| BREATH1 |
83 |
|
|
| BREATH2 |
84 |
|
|
This section is available to you to guide you in creating special
constructions with step by step instructions. Please load up the EXAMPLE.MAP and
EXAMPLE2.MAP for demonstrations and viewing of these effects.
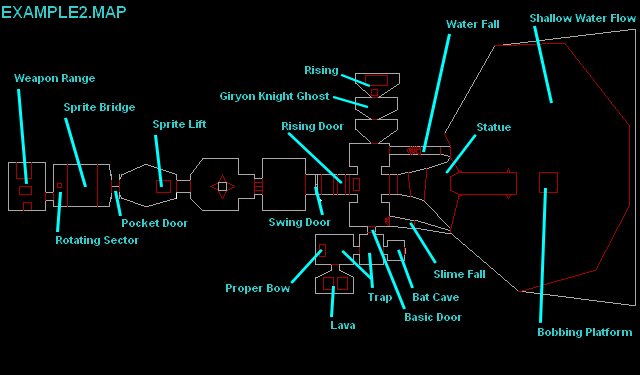
RISING DOOR ROOM:
The following is an example of a room with a rising door (tag 1,6)
that can only be opened by the active trigger sector in front of the
door (tagged 1,1).
To finish it off as the player walks through the door, it will close
automatically when they step on the sector that follows the door
(tagged 1,1). This room is called EXAMPLE.MAP and can be viewed by
loading it.
A BASIC DOOR (Dropping or Raising):
This type of door is seen in WH1 a lot, and the player must open and close it
with the spacebar. These types of doors rise or drop.
1- In 2D Mode create a room with a short doorway.
2- Join the first two points together with a red line.
3- Now join the second two points together with a red line.
4- Move the cursor in that new doorway sector and give it a Low Tag of 6 to raise door or 7
to drop door and a High Tag 0. A High Tag of 1 will just lock the door and the
player will grunt when trying to open it.
5- Go into 3D Mode and texture the base (or top) of the door using the [V]
Key.
6- Now texture the doorframe if you choose too on each side.
7- Move the cursor over the wall of the doorframe and press the oh [O] Key. Do
this for the other side as well.
8- Next lower (or raise) the door with [PAGEDOWN] so you can texture the front and
backs of the door itself.
9- You want to leave the completed door in the closed position for when the game
loads.
A HORIZONTAL SPLITTING DOOR:
This type of door is made something like the BASIC DOOR, but separates in the
middle.
1- In 2D Mode create a room with a short doorway.
2- Join the first two points together with a red line.
3- Now join the second two points together with a red line.
4- Move the cursor in that new doorway sector and give it a Low Tag of 8 and a High Tag 0. A High Tag of 1 will just lock the door and the
player will grunt when trying to open it.
5- Go into 3D Mode and texture the base and top of the door using the [V]
Key.
6- Now texture the doorframe if you choose too on each side.
7- Move the cursor over the wall of the doorframe and press the oh [O] Key. Do
this for the other side as well.
8- Next lower and raise the door with [PAGEDOWN] and [PAGEUP] to
meet in the center. This will allow you to texture the front and
backs of the door itself.
9- You want to leave the completed door in the closed position (top and bottom
meet in center) for when the game
loads.
SWINGING DOORS:
Swinging doors are one of the hardest to make but the most
realistic. This door is seen in WH2 Level 4. Use the following diagram and steps
to make a single swinging door or double swinging door. (double not shown, see
WH2L4 or load up the EXAMPLE.MAP and it can be viewed.)
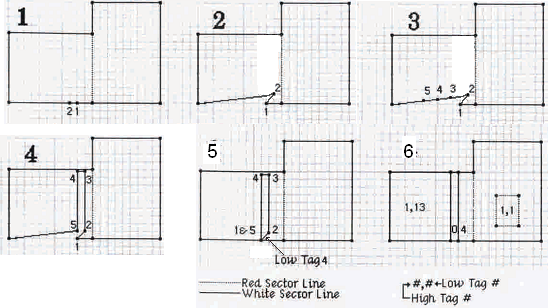
1) Place two points on a white sector line with the [INSERT]
Key.
2) Drag Point#2 in front of Point#1.
3) Keep inserting and placing
three more points on the same white line to the left of
Point#2.
4) Make the points in the shape of a door by dragging them.
5) Move Point#5 on top of Point#1 (these two points will not connect
because they are white sector lines). Place the cross hair on the
short line between Point#2 and Point#1&5 so that the white line blinks.
Place a low tag 4 on the blinking line by pressing [ALT T] and enter
4. (This will be the hinge side)
6) Move Points 2, 3, and 4 so they are on the original rooms white line.
Place the cross hair on the sector after the door and low tag it 13
and high tag it 1. (This room is where the door opens into) Create a small red sector before the door as the
floor trigger. Low tag it 1 and high tag it 1.
A SPLIT POCKET DOOR (BOX DOOR):
This is probably the hardest door to make,
but looks exceptional. This is first seen in WH1Level3. You can find a fairly
unique construction of this door in WH1Level7. With sector low tag 0,16. The two inner walls
of the door are tagged 0,6.
I built this door on Grid 3, you may want to build it on Grid 4 or 5 after you
learned how to build it.
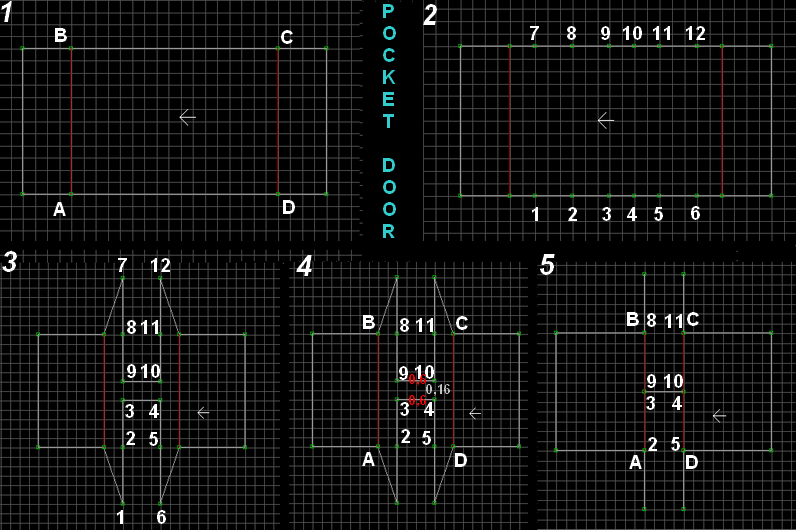
1) Draw your room and insert four points. Next connect points A and B, then D
and C. Then a red line will appear for each.
2) Insert Six points along the bottom white line of the room between the red
lines, then six more along the top.
3) Drag each point forming what you see in the diagram 3 above. Note that the
back of the door is six blocks, that's how long each door is and will slide.
4) Tag the walls between 3 and 4 with a low tag of 6. Next low tag the wall
between 9 and 10 with a 6. Now tag the red sector with a low tag of 16.
5) Drag point A over point 2. Drag point D over point 5. Drag point B over point
8. Drag point C over point 11. Now you want to drag the doors inner walls to the
center, so that they will be on top of each other. Drag point 3 and 4 up. Drag
point 9 and 10 down. (these points will not connect because they are white
sector lines).
SHALLOW WATER FLOW (no current):
These steps will quickly show you how to place water or other liquids to the
floor. This is only knee deep water with no water current to push you along.
Seen in WH1Demo Level1 behind the player start position.
1- Create your sector
2- Apply your water texture(tile90) or slime(tile05) in 3D Mode
using the [V] key. Make sure the cursor is pointed at the floor.
3- Change the water palette to Blue(PAL06) in 3D Mode with [ALT P]
Keys. Make sure the cursor is pointed at the water texture on the floor.
4- Apply the following Sector Tags in 2D Mode. Make sure the cursor
is on the water sector. Use [T] Key for Low Tags and [H] Key for High Tags.
80-89 FLOOR PANNING ( USE WITH LAVA, SLIME OR WATER )
0,84 flow north
0,80 flow south
0,86 flows west
0,82 flows east
0,81 flows northeast
0,83 flows southeast
0,85 flows southwest
0,87 flows northwest
SHALLOW WATER FALL FLOW (no current):
These steps will show you how to make a Water Fall with downward moving water.
Seen in WH1Level1. 1- Create your Water sector by following to above instructions.
2-
Now in 2D Mode divide the water with Red Lines, where you want a
water fall.
3- Go into 3D Mode, and point your cursor at the section you want to raise or
lower. Use [PGUP] and [PGDWN] to accomplish this.
4- Now set the wall textures that will be the water fall; While pointing at the
wall with the cursor press the [V] key and select the water texture. Do this for
each wall that remains.
5- In 2D Mode move the cursor to one of the Red Lines until it starts blinking.
Tag the wall with High Tag 0 and Low Tag 1. Use the [T] Key for Low Tags and [H] Key
for High Tags. This will tell the game to make the water "fall." Do this for
each red wall that remains. A BOBBING PLATFORM:
This can be used as a platform floating in water, or a floor obstacle for the player
to transverse. Can also be used for Bobbing Lava. 1- In 2D Mode, Draw your sector.
2- While still in 2D Mode move the cursor inside the sector and use [ALT S] to
change the white lines to red lines
3- In 3D Mode, use the [V] key to select your texture, such as a wood plank Tile#68
4- While still in 3D Mode, use [ALT P] Keys to set the palette to 0 (default)
5- In 3D Mode move the cursor inside your platform and assign a low tag of 10000
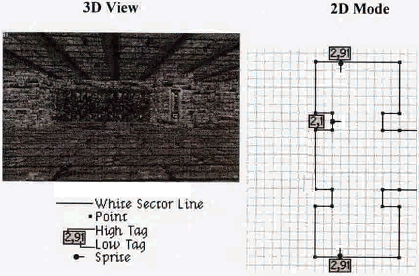
with the [T] key. ROOM WITH TRAPS:
A pull chain (High Tag 2, Low Tag 1) is on a pillar that triggers an arrow trap
(High Tag 2, Low Tag 91) on both the North and South walls (note the direction
of the sprite traps, the stick is pointing the angle you want the arrow to fly.)
This room is called EXAMPLE.MAP and can be viewed by
loading it. (Note: This trap with pull chain does not function in
WH2 v2.0c or v2.0g, but it should, now works in EGwhaven.)
ROOM CRUSH TRAPS:
Sector Low Tags from 1900 to 1999 are crush traps. The sector needs a pull chain
or floor pad to activate it. If the Low Tag ends in 1, the floor goes up, if it
ends in 2, the ceiling comes down. If it ends in 5, floor and ceiling both move
to meet each other.
1900-1999 CRUSHING SECTORS
1900 Raise Floor to Ceiling becomes DOOR #7
1901 Raise Floor to Ceiling becomes BLOCK
1902 Lower Ceiling to Floor becomes BLOCK
1903 Raise Floor to Ceiling then DOWN PERPETUAL
1904 Lower Ceiling to Floor then UP PERPETUAL
1905 Floor and Ceiling MEET and becomes BLOCK
1906 Floor and Ceiling MEET then OPEN PERPETUAL
ROOM CRUSH TRAPS (Pull Chain):
1- In 2D Mode Create your sector/room.
2- In 2D Mode place a default sprite on the wall, preferable on the opposite
side of the entrance to the room. Use the [S] key.
3- Now in 3D Mode point your cursor at the sprite and change it to the Pull
Chain Sprite. Use the [V] key and select tile#370 and hit [ENTER].
4- While in 3D Mode, make the sprite Flat Flush against the wall with the [R] Key.
5- Go back to 2D Mode and move the cursor so its over the base of the sprite.
Now assign a High Tag of your choice with [ALT H]. (make sure you didn't use the
high tag anywhere else) Then assign a Low Tag with [ALT
T], use 1.
6- While in 2D Mode assign the sector/room a High Tag equal to what you set the
Pull Chain for with the [H] Key. Now assign the Low Tag with the [T] Key to 1902 to
make the ceiling come down. ROOM CRUSH TRAPS (Floor Pad): 1- In 2D Mode Create your sector/room.
2- Now while in 2D mode create a rectangle of White Wall Lines IN the room.
Preferable on the opposite side of the entrance to the room.
3- Now move the cursor to inside that rectangle you just created, and change the
walls to Red Lines with [ALT S].
4- While still in 2D Mode, assign the Red Wall Sector a High Tag of your choice
with the [H] Key. (make sure you didn't use the high tag anywhere else) Then assign
a Low Tag with the [T] Key, use 1.
5- Still in 2D Mode, assign the Room Sector with a High Tag equal to what you
set the Red Wall Sector too with the [H] Key. Then assign a Low Tag with the
[T]
Key, use 1901 to make the floor rise. A PROPER BOW SPRITE PICK-UP:
To create a proper bow you must use two sprites of the same tile(#1775). Then
Flip one of the sprites and stack it onto the other sprite. Seen in WH1Level2
and WH2Level13.
1- In 2D Mode place a sprite down with the [S] Key. Use the [B] Key to make it
non-blocking.
2- While in 2D Mode place another sprite down with the [S] Key. Use the [B] Key to
make it non-blocking.
3- Goto 3D Mode and move the cursor over one of the sprites and use the [V] key to
pick tile#1775
4- While in 3D Mode, move the cursor over the other default sprite and use the [V]
key to pick tile#1775
5- Still in 3D Mode, Flip one of the Bow Sprites while having the cursor on it,
use the [F] key, hit it twice.
6- Go into 2D Mode and rotate the stick of ONE sprite one notch, use the
< or
>
Keys.
7- While in 2D Mode, stack the sprites on top of each other.
8- Go back to 3D Mode and move the one of the Bow sprites up; While holding the
(LMB) and [PGUP] until the handles of the Bow are where you want them.
A STATUE:
A Statue is fairly easy. You pick a frame of a Creature you like to have, then
apply a grayscale palette color to make it look like stone. Just don't use the
first frame of the Creature or it will place a combat ready enemy in the game.
Seen in WH2Level1. 1- In 2D Mode place a sprite with the [S] Key.
2- Go into 3D Mode and use the [V] Key to select a Creature, such as Lava Fiend
Tile#778 (Don't use the first frame)
3- Use [ALT P] to set the palette to 8 on the Creature.
A BAT CAVE:
This cave spawns flying Bats. Seen in WH1Level1 near the beginning.
You can also use a Bat dropping (Tile#364) as seen in WH1 to spawn the Bats, no need for a
cave.
1- In 2D Mode, insert two points on a wall.
2- Create a rectangle with all the points.
3- Goto 3D Mode and raise the floor with [PAGEUP] to where you want the bottom of
the cave to be.
4- Lower the top of the cave with [PAGEDOWN] until its where you want it.
5- In 2D Mode place a sprite and set it back from the edge slightly of the
opening.
6- Rotate the sprite so the stick is facing out of the cave, towards player with
the [<][>] Keys.
6- Make the sprite non-blocking with the [B] Key. It will turn blue.
7- In 3D Mode change the sprite to a square grate tile#490 with the [V] Key.
8- Change the sprite to Flat with the [R] Key, hit it twice.
9- In 2D Mode Tag the sprite a High Tag of 83 and Low Tag of 0 with [ALT T] and
[ALT H] Keys.
10- Tag the Cave sector High Tag 83, and Low Tag 4000 with the [H] and [T] Keys.
11- Create a full Red Sector or floor plate. (the sector you want the player to
be in to activate the bats)
12- Now Tag the Activating Red Sector to High Tag 83, Low Tag 1.
A SPRITE LIFT:
It lowers or raises the player via the spacebar. This is an advanced
construction, it may become difficult. This type of Lift is seen in WH1Level1
and another type in WH1Level4.
1800-1899 MANUAL ELEVATOR. You should end the sprite tags in 0 for a down lift,
1 for an up lift; only 1800, 1810, 1820, and 1801, 1811, 1821 appear to be valid
for the sprites, despite the sector tag being a range. These Low Tags may work
for a sector but I have not tested them. PART 1: Preparing the Room and Sprites 1- In 2D Mode, create your sector.
2- In 3D Mode, raise the ceiling and lower the floor so that it's at least tall
enough to require a Lift.
3- In 2D Mode, place five sprites down that you will be building the Lift with.
4- In 3D Mode, change each sprite to a square grate tile#490. With the [V] Key.
5- In 2D Mode, tag three of the sprites that will be the walls of the lift;
0,1800. Use [ALT T] Keys.
6- While still in 2D Mode, tag the ceiling sprite 0,1820 and the bottom sprite
0,1810. Use [ALT T] Keys.
7- In 3D Mode, change the alignment of the wall sprites to flat with the [R] Key
twice.
8- Now change the alignment of the top and bottom of the Lift sprites to
parallel with the
[R] Key, three times. PART 2: Forming the Top and Bottom of the Lift 1- In 2D Mode, move the bottom sprite to where you want it, usually close to the
adjacent sectors doorway.
2- In 3D Mode, use [PAGEUP] to raise it to the adjacent sectors floor height.
3- In 2D Mode, move the top spite on top of the bottom sprite, stacking it.
4- In 3D Mode, use [PAGEUP] to raise it to NEAR the floor sprite height.
5- Next, raise it 32 [PAGEUP] Key presses. So that's how tall your Lift will
be, from bottom to top.
PART 3: Forming the Walls of the Lift
1- In 2D Mode, move the Wall sprites close together, two blocks on Grid 3.
3- In 3D Mode move the Wall sprites to form a tall box, you'll have to use [PAGEUP] and [PAGEDOWN] to get the sprites where you want them. You may need to
re-enter 2D Mode to rotate the sprites stick so the walls are lined up
correctly.
4- Now you'll have to stretch the walls of the Lift so that they form a complete
box. Using the [NUMERIC 2 and 8] Keys.
PART 4: Creating a Red Sector
The up movement is relative to ceiling height of the sector, not starting
position of the lift. It's reliant on ceiling height.
1- In 2D Mode create a Red Sector around the Lift, make it larger than the Lift
itself.
2- In 3D Mode raise the ceiling of the Red Sector directly above the Lift 21z
Key Presses, [PAGEUP]. So that the Red Sector ceiling is higher than the
surrounding ceiling.
3- Next, Raise the floor in the Red Sector a few times to create a base for the
Lift to set on when its in the full down position.
SPRITE SWINGING DOOR:
This type of door is seen in WH1 Level1 and is opened by the player with the
spacebar.
LOWTAG
80 FOR IRONBARS(3000) OR SPRITEDOOR , HITAG IS 1-2 SWING DIRECTION.
For more sprite doors/gates see the SPRITE and TILE NUMBER Section.
1- In 2D Mode, build a red rectangle sector inside a passage way.
2- Tag the sector 0,3000.
3- Place two sprites down and at either end of the rectangle.
4- Go into 3D Mode and change them too
SWINGGATE Tile#477 and
SWINGGATE2 Tile#478
5- In 2D Mode, rotate them so one stick is pointing opposite the other. Like one
north one south. Check in 3D Mode to see if the gates are rotated in the closed
position. If not go back to 2D Mode and rotate.
6- In 2D Mode Tag one gate 1,80 and the other 2,80. The gates when play tested
should open the way you want them too. If not switch the tags around.
A SPAWNING FIREBALL TRAP:
This type of trap is seen in WH1 Level1 and is activated by sector or floor
plate. It an auto-aim trap.
1- In 2D Mode create your room.
2- Give the room a High Tag that your not using anywhere else. Capstone used
values like 40,47,48
and 49.
This will be your activating sector. You can place the activating sector or
floor plate anywhere really. Usually before you enter the room so the fireball
trap has a chance to fire at a fast moving player.
3- Place a sprite, Give it a High Tag equal to your activating sector.
4- In 3D Mode change the sprite too a SPAWNFIREBALL Tile#1717 and change to
alignment to flat with [R].
5- Raise the Sprite to where you want it.
6- In 2D Mode place it on the wall, and rotate the stick so it points into the
room.
7- Make it non-blocking if its low enough to where the player will run into it.
SPRITE BRIDGE:
This type of bridge is seen in WH1L1 over the battle area in the beginning.
1- In 2D Mode lay down your sprites with the [S] Key in the expanse. Put
down as many as you need.
2- In 3D Mode change each sprite to a SPACEPLANK (tile271) with the [V]
Key.
3- While still in 3D Mode, change the alignment of the sprites to Floor Aligned
with the [R] Key.
4- Use [PAGEUP] to raise each of the sprites into position.
5- Use [numeric keyboard 2,4,6 or 8] to stretch or shrink the sprite to
best fit in the expanse.
6- In 2D Mode change the position of the sprites so they are not clipping the
walls at the end of each plank.
REVOLVING SECTOR:
This is fairly simple example. The range for Low Tags are
2100-2199. Best used on red sectors, but can
be used anywhere. Not sure what the range actually changes.
1- In 2D Mode create a small Red Sector.
2- Give it a Low Tag of 2101 with the [T] Key.
3- In 3D Mode, raise the Red Sector a few groups up with the [PAGEUP]
Key.
4- Now so the top texture rotates with the Red Walls, press the [R] on
the top.
ENCHANTED WELL:
These Wells are seen in a few different forms in WH2, L2, L5, L7 and L13. The Well itself uses the CONE Tile
449 as a sprite that generates the blue sparks and gives the sector its in a low tag of 50
automatically. It's effectively making that sector a Weapon Enchanting area.
There is normally a circular pond created with a Floor Mirror Tile 182 used
to represent a reflective water effect. Most have a shrine construction around
them. The shrine consists mostly of Well Wall Tile 355 set to a PAL of 6. Even
blue parallaxing skies are used on occasion, Tile 210.
To give a Well more than one usage, High Tag the cone sprite 9 for two uses, 10 for three uses,
11 for four uses, 12 will give fives uses etc...
X PANNING WALL:
You place a sector low tag of 11 like any
other and all the walls in that sector will scroll from right to left. Speed
and Direction appear to be hard coded.
ELEVATORS:
These Elevators I haven't seen used in WH2, Capstone seemed to have used
rising sectors instead of these. But a Low Tag of 1000 produces a PLATFORM ELEVATOR
and a Low Tag of 1003 produces a BOX ELEVATOR; Must be activated with a
floor pressure plate, they rise to floor height once,
and fast. They both seem to do the same thing...
VERTICAL SPLIT DOOR:
This is something else I haven't seen used by Capstone. Apparently left
over from WH1, don't even know if the code is complete. But a Low Tag of 9
produces a VER SPLIT DOOR. I Don't know how to construct it but placing the low tag
seems to do something, a bit of wall morphing...
OVERLAPPING SECTORS:
There are a few examples of Overlapping sectors used in WH1 and WHII.
They represent spiral staircases that at times have been made for three
tiers up and down with doorways that allow the player to enter each
floor. Also there where a few passage ways made above and below the
current level that usually went clear across the map. I haven't at this
time constructed any so I don't have any build instructions.
You can learn a lot of tricks if you examine Witchaven 1
demo, Witchaven 1 and Witchaven II maps. There are more specials found
than I have listed here. But read on and see what you can find new to you!
WH2
*Level 1 has Lava Fiend Statues, Tile#778 (The 2nd Tile); Creature set to PAL#08 Grayscale.
*Level 1 has a Giryon Knight with Sword & Shield, Tile#3426 in the Treasure room that spawns ghosts via PAL#4
*Level 2 has the standard enchanted well, no tags.
*Level 4 has a double Swing Door.
*Level 5 has an enchanted well, tagged 3,0.
*Level 7 has an enchanted well, tagged 0,2.
*Level 7 has a
GONZOSHJUMP Tile 3636 that
activates when a sector is entered, needs a low tag of 1. Automatically
breaking the glass he jumps threw.
*Level 9 has a GONZOHMJUMP Tile 3630 that activates when a sector is
entered, needs a low tag of 1. Automatically breaking the glass he jumps
threw.
*Level 12 has Patrol/Chase point sprites. Most likely to keep enemy in Chase
Mode?
*Level 12 has a Wall Swinging Door.
*Level 13 has another enchanted well, no tags.
*Level 13 has overlapping over sector, most prominent is a circular/spiral
stairwell/staircase going up and down.
*Level 13 has a bow that's set up to look right, instead of the half bow. It
consist of two of the same sprite, one flipped and both sprites stacked on top
of each other.
WH1
*Level 1 has Flowing Water with a two sided Water Fall AND ambience water flow
sound. No sound for WH2.
*Level 4 has another Sprite Lift; in the big lava chasm area, near
the far end of the broken bridge, on the left.
*Level 7 has a Unique Pocket Door, much thicker door. Works in WH2.
*Level 8 has bar doors activated by a sector. Works in WH2.
*Level 8 has barrels tagged 77,0 that become breakable only when activated,
activating sector
tag 77,3001. They are almost sitting center line on the wall so
there contents fall when broken by the brown Ogre's above. Works in WH2.
*Level 9 Over lapping Sector, a tunnel, goes clear across the map. Works in WH2.
*Level 19 has a large Pocket Door. Works in WH2.
WH1 Demo
LEVEL 1
Overall this level uses all kind of special effects. Even some you can't use in
WH2 (see not working in WH2 section below).
*has a dock with water and a sky texture that produces Thunder and
Lighting, and Buggy Wind Sound. Works in WH2.
*has a blocking Red Wall (now purple), to prevent the player from entering the
unfinished dock area. Works in WH2.
*has a Bat Cave, see construction steps. Works in WH2.
*has a sleeping or resting Green Goblin that "awakes". Does not work
in WH2.
*has Flowing Water with a two sided Water Fall. There are no water flow
sounds in the Demo. Works in WH2.
*has a Sprite based catwalk with a Sprite Lift/Elevator, going down or
up with chain and movement sounds (hardcoded to the tags?), activated with the
players spacebar. Works in WH2.
*has a Sprite Door, using SWINGGATE (Tile#477) and SWINGGATE2 (Tile#478),
Tags are 1,80 and 2,80. Red Sector is 0,3000. Works in WH2.
*has Purple Invisible Walls; Blocking red sectors.
The enemy and player can't attack/can't pass through. Works in WH2.
LEVEL 2
Overall this level uses a lot of activating sectors that open doors half the map
away. Capstone used a low tag of 2 on an activating sector a lot, instead of the
normal 1 that open doors. 2 Indicates ACTIVATE ONCE.
*has a circular/spiral stairwell/staircase. Works in WH2.
*has a full, proper Long Bow Sprite. Works in WH2.
*has a lot of exterior wall stained glass windows. Works in WH2.
*has a first used door with a low tag of 7 and one with 8. Works in WH2.
*has another Bat cave. Works in WH2.
*has Spike pit sector low tag 0,4444 that I don't know what it does.
LEVEL 3
*a SPAWN sprite at the very beginning, don't know what it does. EG: the sprite
appears to get removed without having any effect when the map loads.
*has a Split Sliding Door Construction. With sector low tag 0,16. This door is
built with walls, its located center of map. The two inner walls are tagged 0,6.
Works in WH2.
*has more wall doors I think activated by the player spacebar, EX: 0,1124 and 0,1131.
Works in WH2.
*has a Maze at the end of the map that forms when activated by sector. 20,1901
activator 20,1. Works in WH2.
*uses a lot of sprite swinging doors including Swinghole door. Works in WH2.
*has a decorative lava falls. Works in WH2.
*more sprite-less windows. Works in WH2.
*a three spawner big bat cave. Works in WH2.
*uses the Horn Skull to end level and game. Works in WH2.
============================
NOT working in WH2 but works in WH1
(for incorporation later,
for EG use)
============================
Activated Sound Sprites:
WH2 doesn't support SNDLOOP ambience sound calls. Such as in WH1 Level1
where you would hear water flowing. In the WH2 maps, there is no evidence of
such a sector effector. (Note: Sound List is in the SNDMOD.H file, the WH2 list is different
than WH1's.)
Activate Enemy Sprites WITHOUT seeing the player:
WH Demo Level 1 and Level 2 has activating enemy sprites without seeing player first; The sector
with the sprites in it is given tags 99,4001 and the sprites(Goblins, green and
brown) are given tags of
99,0 and the activating floor plate or sector is given tags of 99,1. This was to
activate a small battle between the two Goblin entities before the
player approached. You can hear the battle before the player gets to
it. Also a second area is
98,4001 Activating sector for sprites(Goblins) Tagged 98,0 . activating sector
is 98,1 . Does not work in
WH2(there are no battling goblins).
Lava Cracks Open When Player Walks On Them (WH1Demo Only):
WH Demo Level 1 has "Volcanic"/Lava cracks that form when player walks over
them; The red sector lava cracks are given tags of 0,3501. Doesn't work in WH2, the cracks
just don't form. Its seems in the full version WH1 they dropped this function
and went with open lava cracks, which sucks cause the other effect
was better in the demo.
Palettes
Pal # - Type - Base HP
0 - Forest Goblin (green) - 15
4 - Desert Goblin (yellow) - 25
5 - Mountain Goblin (brown) - 35
3 - Pink goblin - 15 (Undocumented, appears rarely for instance
in the ending area of level 3. Possibly a map design oversight
as they seem to be identical to forest goblins stat-wise,
HOWEVER, if you put green and pink goblins together they would
probably in-fight like other types, judging by the code,
although AFAIK there's no place that puts them together in the
default maps. I haven't tested with a custom map.)
Further caveat: Goblins placed with the GOBLINCHILL sprite
(Instead of GOBLIN or GOBLINSTAND) will always be spawned using
a base HP of 15 regardless of palette.
Spike Pit Low Tag
0,4444 this is placed inside a spike pit, there's an
area in the pits where there
is no spikes...anyhow, I removed the spikes sprites and then ran the
WH2 game and entered the pit, nothing happened out of the ordinary.
I then just removed the low tag and kept the spikes in, still didn't
notice any change. I then loaded up level1 of the full version of
WH1 and
there was no low tag assigned to the lower levels but later levels
used this low tag, so it may just be a mistake or
whatever they where trying to do, and perhaps incorporated it into the WH1Reg
exe instead of a low tag having to be present.
[END of
Manual]======================================================HI=EG==
///////////////////////////////////////// MISC TEXT TO TEST AND TO ADD ////////////////////////////////////////
/!\
If your out there anybody, I need help testing the following text, I ran
out of time and juice to continue my work/testing on this document.
EG: The following didn't seem to actually do anything when I tried them in a map,
and looking at the source there might not be accompanying code for them in
Witchaven 2. I haven't checked the WH1 source regarding these yet...
* sector lotag 70 is read as a "skypan" sector
* sector lotags from 900 to 999 are read as a "lavadryland" sector
Corvin: Hmmm, not sure...Couldn't get these to work either, what ever
there suppose to do.
DARK: DARKENS FLOOR CEILING AND WALLS
Not sure why they didn't used shading in WH1 for this purpose....
MDARK " (Tile#530) More Dark
VDARK " (Tile#529) Very Dark
XDARK " (Tile#532) Extra Dark
EG: Be a good idea to note which items resize by the game.exe and which
ones don't.
Corvin: I'll have to test these items out to see which ones do and do not.
ONLY on WH2L12 has Patrol/Chase point sprites (Tile 447). Most likely used to
keep the enemy in Chase Mode. Did several test with differant A.I. but
couldn't figure out what the points really do. Chase
points only effect: KOBOLD, IMP, MINOTAUR, SKELETON, GRONSW, NEWGUY,
NEWGUYBOW, KURTSTAND, GONZOCSW, GONZOSW, GONZOGSW, GONZOGHM and GONZOGSH.
These groups can potentially switch from CHASE to SKIRMISH state under the
right conditions.
///////////////////////////////////////////////////////////
Corvin: WH1 Files looked at for Tags and effects:
TAGS.TXT , BSTUB.C , KEYDOORS.
What remains is the following...
///////////////////////////////////////////////////////////
----------------------------------------
SECTOR LOW TAGS From WH1 TAGS.TXT:
----------------------------------------
2000-2999 COMPLEX DOORS WITH KEYS (Note: Looking at the WH1 src and
specifically KEYDOORS file, Capstone has redefined these with 60-80 low
tags, see complex doors in manual above.) But I still see the code is in the
WH2 source. So do these doors still function or is this range now for
something else?
2###
#DOOR TYPE
#DOOR ANTIC
#KEY TO OPEN DOOR
DOOR TYPE:
0 = UP
1 = DN
2 = MIDDLE
DOOR ANTIC:
0 = STAYS OPEN
1 = MANUAL
2 = DELAY
3 = LONG DELAY
KEY TO OPEN DOOR:
0 = NONE
1 = BRASS KEY
2 = BLACK KEY
3 = GLASS KEY
4 = IVORY KEY
///////////////////////////////////////
NOT working in WH2 but should be!
//////////////////////////////////////
Corvin:
Shift M seems to has no function like is does in other editors....However
pressing the [M] twice or three times may have the same effect on the wall,
I'll have to look into this more....
Corvin:
The Editor source code has BSTUB.C dated 3-4-1996. This is dated
almost three months after the Editor included with WH2.
EG: I made a first try at this, but had some problems so far. I'll
look deeper into it later to see if I can sort them out.
|